For the past 2 Januaries I have committed myself to finishing 31 projects in as many days. Now before you complement me on my dedication, not all the projects are what you might call 'projects'. For me, it's a month to get rid of that 'to-do' pile in my corner, which consists mostly of sewing jobs. I have a bag full of items that need mending or finishing, but I also use the opportunity to force myself to create. My first year I sat down on January 31 at 10pm wanting so bad to go out to a show but needing one more project. So I picked up the end of a tie left over from a previous project, sewed some velcro on both ends and voila...a beautiful bracelet.
This year I've decided that my pile has gotten a little too big again so I'm moving the excitement to May, as in today! As I continue posting, you'll see projects from previous years, but for the next 31 days, my posts will be all the marvellous items that I make in my May 31 in 31. Feel free to join me, support is always helpful. It keeps you up to speed. If you send me pictures of your work I'd be glad to share it with my small world. I love seeing other's creativity.
OH! This is not a 'project a day' type challenge. I can't have that kind of pressure. It's a 'do 5 projects in one day and then sit and relax for a week' type thing. This adventure is purely for your own enjoyment and sense of accomplishment, so enjoy it. And enjoy the sun!
Saturday, May 1, 2010
Thursday, April 29, 2010
Corduroy Autumn Bag
This was an experimentation. My thought process in making bags goes like this: How can I take this strange material/object and turn it into a bag? This typically leads to intricate folds and shapes that are inspired by my material. On this bag, however, I tried to use more than one kind of fabric and add some non-essentials. The result? I think it's great. It's just not really my thing.
 So everything you see is corduroy pants, which makes it feel quite nice. There are four square panels of brown on each side, decorated in green and edged in orange. (I just happened to have fall colored cords lying around.) The handles are two layers, one green and one brown, and the whole thing is lined in green. I quite like the general shape and how the brown cords lie in intersecting patterns causing a nice sheen/matte contrast depending on the light.
 For the most part, however, I have abandoned non-essentials. I may try again soon. Maybe.
Thursday, April 22, 2010
No-Sew Scarf Bag

No Sew bags are my favorite because they're usually really quick and easy and I get complimented on them more than any other bag. Sad, almost... This one is really amazing, though. Your materials include: a scarf. That's it. And two working hands; though all you need to do is tie knots, so you can probably even manage one-handed.
Start with a scarf, sarong, or any rectangular material. The thinner the better or the knots get too bulky. My scarf was about 56"x40" ish.

The next step is to fold the scarf in half like a hamburger, short ends together making it more like a square. I do wrong sides together so that the hem is on the inside of the sandwich. (If you have a thicker fabric, you can start off with a square piece and not fold it in half. Scarves tend to be thin and therefore need the doubling for durability)

Next, bring to opposite corners together...

...and tie them in a double knot. It's your choice how close to the corners to tie. I like a little bit of bunny ear flop.

Next, if the scarf is not perfectly square, find the shortest edge that leads to the right corner. In my case, this edge is coming from the lower half of my double knot.

Taking the right corner, wrap it around the lower half of the knot, over top first...
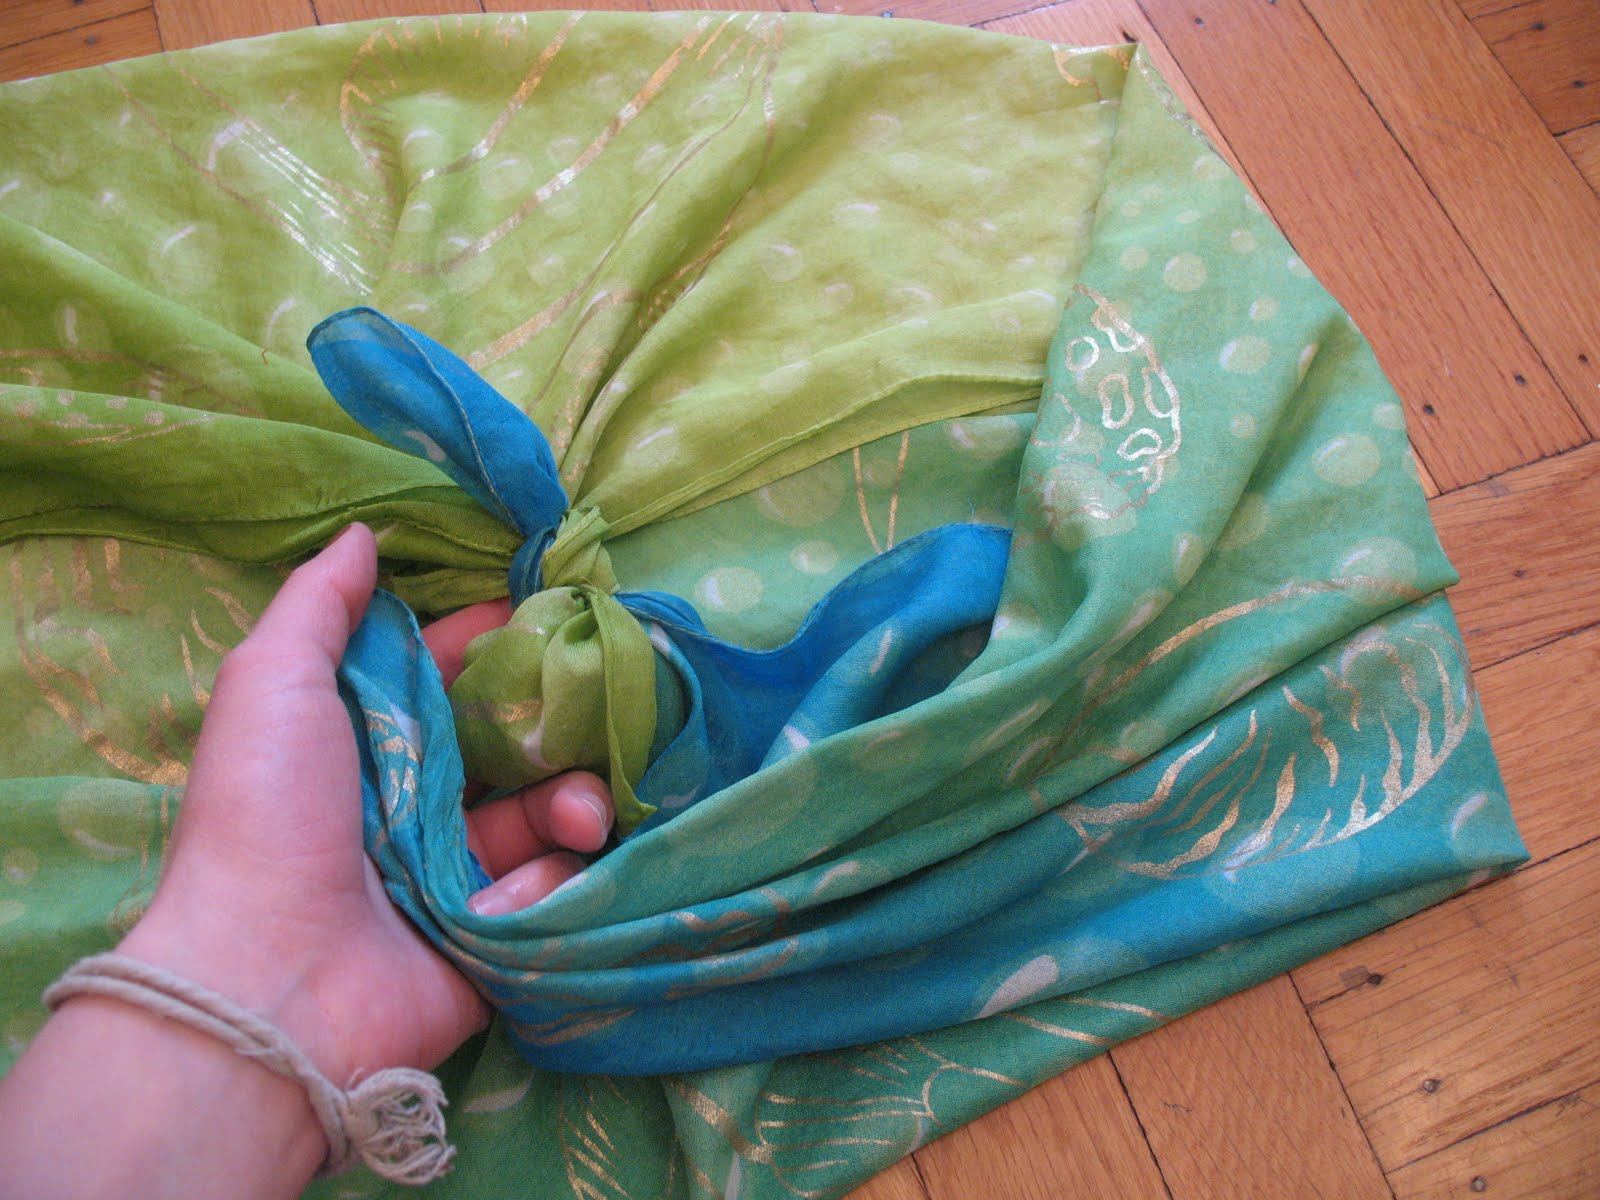
...then underneath so it comes up on the same side you started wrapping from.

Do the same for the left corner: find the shortest edge...

...wrap it over the top of the higher half of the knot...

...and pull it back under to the left of the knot.

Now the two corners are on the same sides they started on, but they're twisted around the double knot.

Tie the two ears corners together...

...into a double knot.

And there you have your final scarf bag. It's very simple and the best part is, you can undo it and use it as a scarf again. Once you get the hang of it you can do it in less than a minute.
If your scarf is still not close to square when you fold it, try putting the fold 1/3 of the way down instead of 1/2. That will be the bottom 'seam' of the bag.

If you put the excess fabric on the outside of the bag it hangs and, in this case, gives the bag a nice fringe along the bottom. You can also put the excess inside for a cleaner look.

Wednesday, April 14, 2010
Clave Case


This was a little side project. I made a crocheted case for a friend's claves. As far as I can tell/remember I simply single crocheted a tube till the length was correct, crocheted a decreasing flap and chained a loop to go around a button that I sewed on after. Really easy project, great for pumping something out quickly and I didn't have to have perfect dimensions because the yarn stretched perfectly to fit the claves snugly. Again, for dimensions, I just experimented til I got the girth right. (I just wanted to use girth.)
Sunday, April 11, 2010
BackPack


 So it was when I was student teaching and riding my bike to school that I realized I needed a backpack (my usual shoulder and messenger bags kept sliding in front of me, throwing off my balance and too often hitting my knees as I pedaled). Since I never spend money if I don't have too, and since I
  have this little habit of making bags, I figured I'd go for it and attempt to make a back-pack. So it took an XL pair of green dickies and some spare scraps of upholstery fabric to do, but it was actually quite simple. The body of the bag is a tube of fabric from the pant legs; add a rectangular bottom and elongated top flap and the bag part was done. I didn't have any access to zippers, buttons or snaps at this point (I was mostly living out of a suitcase) so I just put in ties. The ties are rectangles of the pants folded twice and sewn into strips and then sewn opposite each other on the front and back of the top hem. The straps (not adjustable) are actually 3 layers of fabric covered in the upholstery textile just to make them more cushy and durable. Favorite part: the pocket. I cut the pocket right off the pants and resewed it right along the original stitches so it looks like it's meant to be there. I really love this bag. It's green.
Friday, April 9, 2010
Cable Knit Bag


This is my first major knit bag, that I can remember. The handle (which you can't see) is a long knit cable. Crazy part: I knit the body of the bag as a rectangle, which means I had to pick up stitches from the edges to knit the side segments. Trust me, it was crazy, especially since I was winging it. Never had a lesson. I added the hot pink on the inside for a blast of color; it was getting too blue.
Wednesday, April 7, 2010
Giraffe Bag


This was a very early bag. It's made from an old pair of jeans and some left-over fabric from my brother's down-comforter cover. It's reversible, since you never know when you'll need a little giraffe print in your wardrobe. The handles are finger-crocheted twice for thickness. The best thing about this bag is the edging. I personally whip-stitched yarn around the two sides and the two top edges with variegated yarn. It was very time consuming, but it created a beautiful finish to my previously exposed seams. Luckily the bag is only 8"x9".
Tuesday, April 6, 2010
T-Shirt Bag


This bag is made from, surprise!, a t-shirt. All the fabrics were actually from a singular shirt. The orange circle was on the front, the black swirls were on the back and the inside pink pocket was the sleeve. The strap goes from the left side of the back panel to the right side of the front panel. It was a very busy shirt and therefore it makes a very busy bag to wear with another very busy shirt. Enjoy.
Subscribe to:
Posts (Atom)