Saturday, August 17, 2013

GillyWhig's Everywhere! a WiP Quilt

This is my GillyWhig Quilt.  I would have called it the WhirlyGig Quilt, but my husband couldn't remember that name.  GillyWhig is what came to his mind.  So GillyWhig it will be called!  (Though he just called it something new - Squirlywiggle. Excuse me, I've been notified that it should be two separate words - Squirly Wiggle.  I like this one a lot.  Looks like I might need to make another quilt!)


It's a round quilt, because I couldn't get those darn 90 degree corners to work!  Well, that's not the only reason, but it's a nice thing to think about!


My husband suggested a pinwheel quilt and I decided I liked the idea, so I found the pinwheel block and created my own design from there.  I like the above pinwheel though, where the lighter color is 2x as large, as opposed to the ones where they're the same size.  This is more like the real whirligiggles.


I/my husband also thought that the wigglewirls were way too pointy, so I used that fancy plate tool to curve off the corners. (Not the ones that met in the center, just at the top of the light triangles.)


I then had to sew curves!! First ever, from what I recall. I used the curved pinwheel as a template for the blue triangle piece.  (It would have been a lot quicker if I had made a real template.  Each one was a little different (darn those plates), so I had to trace each individual blade of the whiggywhirls.  Took much longer.  But it ended eventually!)


Sew those curves! I didn't bother pinning.  There was lots of haphazarding going on, so I was ok w/o pinning and just squaring things up in the end.


The blue end seems a little wonky, just ending in the middle of the side, but with the 1/4 inch seam when I sew it to the blue background, it'll curve nicely into the seam, no odd endings.  I love my rainbow of girlywhigs.


Husband likes the blue and green and purple.  I love the dark orange, red and pink.  (Sorry for the off colors, I'm photographing inside under a yellow bulb at night.)  But that's why there are so many!  So everyone can have a favorite!


I love my pretty rainbow.
What I don't love are blisters.  Like the following blister I got from steam!! Evil steam.


Never have your fingers close to the top of a pot of cooking rice as you take off the lid!  Your finger will blister up and get all shiny and painful!


The only thing I had in the freezer that wouldn't defrost and get all nasty as I sat through a concert that night was a bag of chocolate chips.  They didn't help a great deal with the pain, but they were a tasty treat while I listened to the orchestra!  Chocolate cures everything!

See you soon!
(with fewer injuries, I hope!)

Wednesday, August 14, 2013

My Sights of Seattle

What the family we are staying with owns.  Jealous!!


What greets you when entering the neighborhood park...


The locks, where the boats tie up so perfectly in size order.


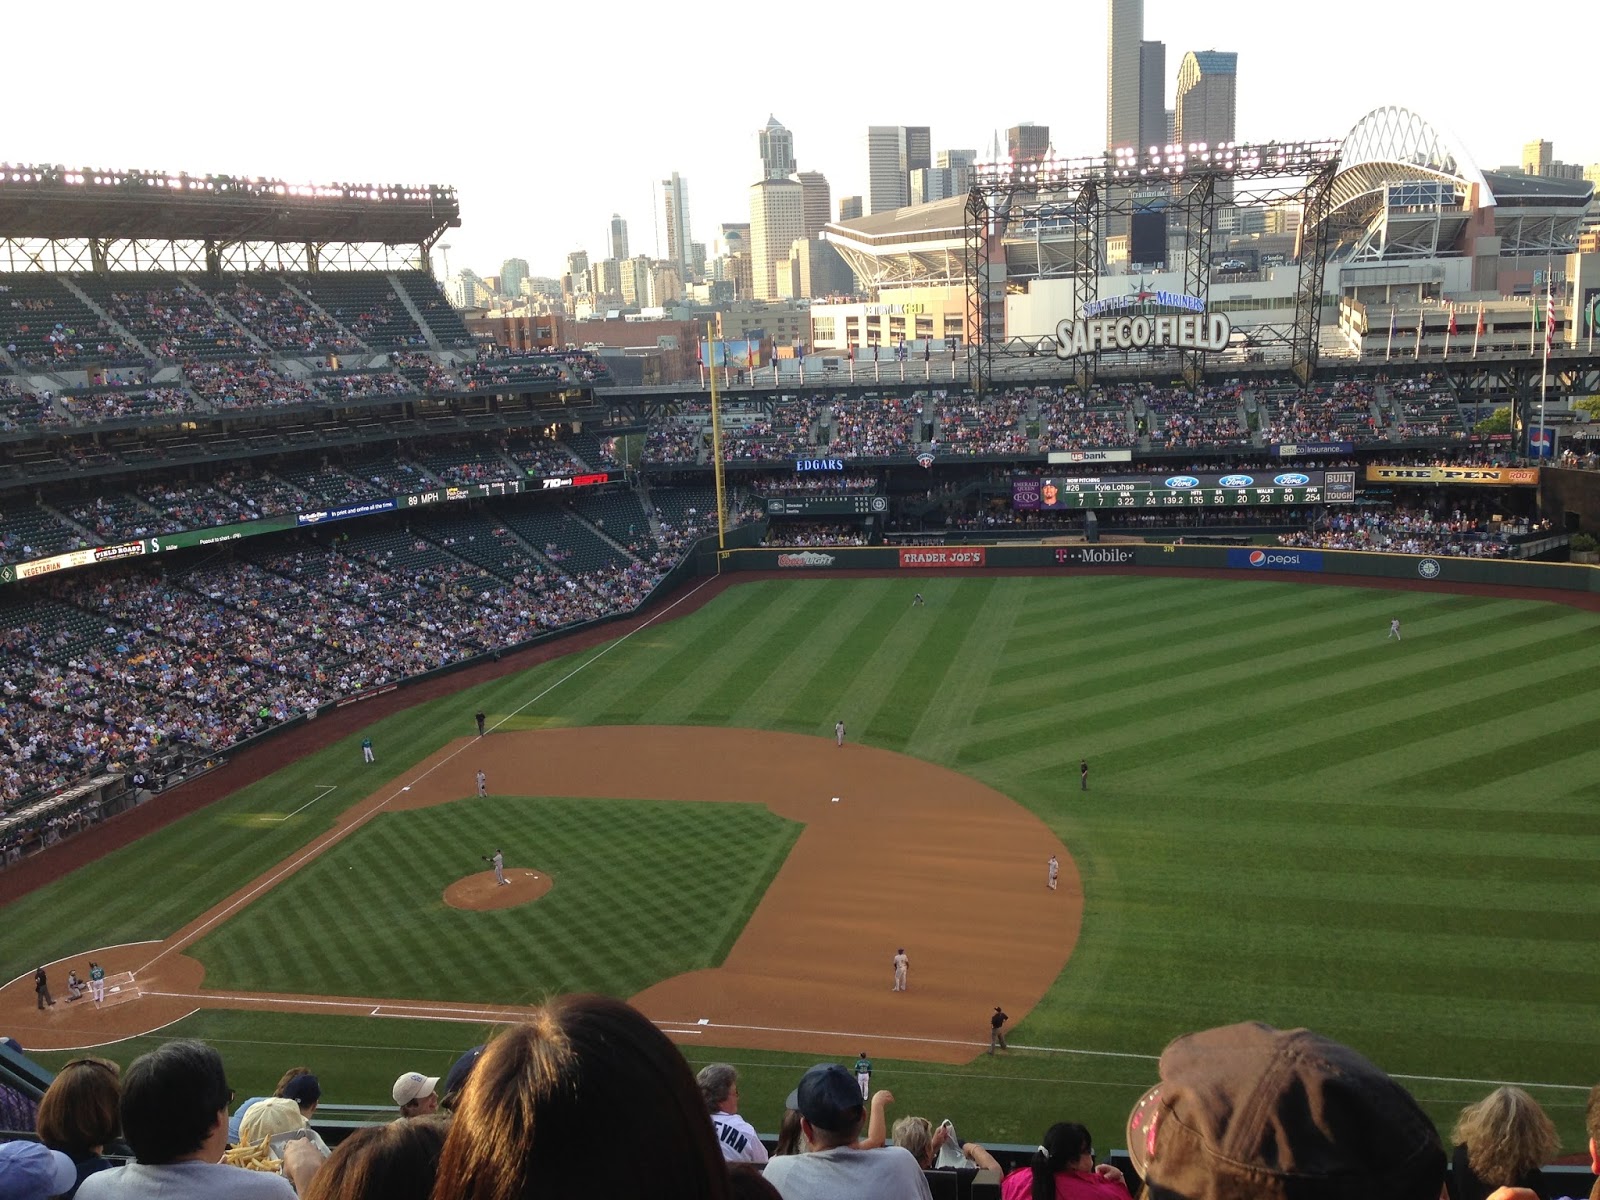
Safeco Field - bad night for the Mariners, but a very action filled game after the first 3 or 4 innings.   (And I got to check a major league field off my list and got some cute earrings with the compass logo on them.  Perfect quilt block inspiration.)


What you eat.  Monstrous pizza.  That's an iphone 5 my husband is graciously using to show the size here.  And they say everything's bigger in Texas.  I'd be scared to see their slice!


Those have been some sights here.  Honestly there have been many more but I am not a person to stop what I'm doing to line up a shot, even when it's just on my phone.  But I'm ok with that, though it means fewer photos to share of my travels.  I take a lot more of my handiwork, so you'll see plenty of that!

See you soon!
(with some fun inspiration)


Monday, August 12, 2013

GillyWhig Quilt (WiP)

This is the beginnings.  Oh I am so excited about this quilt.  I'm calling it the GillyWhig Quilt, which I'll explain in a later post.  Check out my fabrics!!!


My husband was up working in Everett, WA for the morning (remember we're in Seattle for the month), so I drove up with him and had an enormously hysterical morning trying to find a cafe in which to enjoy a cup of hot chocolate (yes, it was cold enough to want one! I loved it!) and wait until 9 when the fabric store opened.


But the fabric store was amazing!  My only 'local 'quilt' store' in Idaho is JoAnn, so I was excited to see anything that was different.  I spent 2 hours in the Pacific Fabric & Crafts store picking out the 19 different patterns and colors.  Oh I was in heaven.  I had to carry the bolts up to the cutting table in 3 trips. I had taken over a display table to figure out my choices.  Why don't quilt stores have tables for decision making?  There's never space to lay it out.  But the ladies their were lovely, so it was ok.


So I have darks and lights of each fabric.  And I wanted a curve in the pieces.  So I drew one...


with my fancy curve drawing device...


a plate of course!  (I'd use a compass but I don't own one, shockingly).  I was realizing today that a template would have been a better idea for this step and the following one as well.  Live and learn!  That's what happens when you design your own quilt.


Continuing on with my food adventures, look what I've been eating recently...


... a fresh fig! I'd never had one before last week and it made me feel very naive and sheltered in terms of food (which I don't think I am, but I've only ever had dried fig before.)


It's so funny looking inside, but it's really tasty.  Sort of reminds me of a kiwi, especially with the little pink seeds at the end of the tendrils.


Fun eats, no?

See you soon!
(with more sights of Seattle, methinks...)

Sunday, August 11, 2013

A Quilt for my Niece - Part 2!

And the quilting began!  Yes, indeed, I have a very small armed machine, and yes, indeed, the quilt is about 6 x 6 1/2 feet.  It was fun times for all.  Surprisingly it wasn't horrible, which I was sort of expecting.  It slid through the arm much easier than expected when I needed it to and I tried quilting in a way that didn't require an enormous amount of whole quilt turning.


I love the back.  I quilted around each diamond in the ditch, then made an X through each large diamond (again stitching in the ditch) that made up the star, effectively creating 4 diamonds inside the larger one...


...which looks like this on the back, which I love!!!


This is a larger picture of the back.  I didn't divide up the diamonds that go around the star, I liked leaving them emptier, bringing the focus on the center star.  (Sorry for inadequate pictures, I was in a poorly/not really lit at all apartment in Salt Lake.)  


This next one is to show you how amazingly my seams match up!  I was quite proud of myself.


I quilted nonagons in each corner triangle of the quilt.  (Yellow side is top, lilac side is the back).  I quilted both top and bottom in yellow, so it blended on the top and just peeked through on the back.  


I then quilted each yellow square around the star with things my niece is interested in.  The fabrics a bit wrinkled from being folded, but you can still see the quilting.
A microscope for her love of science...


The deathly hallows symbol from Harry Potter...


A piano keyboard for her love of music...


and a wolf, because they're awesome! (and she likes them)


I put stars in the other 4 squares.
2 Star of Davids...


And 2 five pointed stars...


I was so excited to be done with the quilt, when I found this...


Somehow the fabric got sliced through, all the way from front to back.  I don't know how, since I wasn't near this thing with a rotary cutter once I started sewing it together, yet that's what it looks like happened.  So I put my thinking cap on.


I hadn't made a label for the quilt, so I decided to use this as an opportunity.  I embroidered her initials on a scrap of matching yellow and stitched it on the front to patch the slice...


...and then embroidered my initials and the year on purple and stitched it on the back.


I think it was rather genius, and now there's a bit of a label on it.  So there's the quilt!  I'll try to get it outside and in natural light for a nice big picture before sending it off.  But in the meantime, check out our chicken pot pie we made today...


Yeah, it was a bit much.  We took off the top half of filling and saved it for another pie for another day.  Yay for more pie!

See you soon!
(with a sneak at a current project!?)

Thursday, August 8, 2013

A quilt for my niece (Part 1)

Remember when I mentioned that I was going to make a quilt for all my nieces and nephews when they turned 12?  I'm super excited because I've now officially made my first!  I was nervous to put it up (because I haven't sent it off yet) but then I realized that she probably has no idea I have a blog, and I'm not sure her mother does either, so they won't accidentally happen across it.


It started with me asking her (through her mother and facebook) questions about all her 'favorites': colors, shapes, animals, books, movies, hobbies, etc. 
While her favorite colors were gold, aqua marine and lavender, I didn't have quite the selection of fabrics to get that specific, so I took artistic license and used the following instead.


The 3rd from the left was actually gone when I went back to buy the fabric (I hadn't done all my measuring and calculating yet) so I got a cute blue geometric square fabric pictured in the diamonds below.  Her favorite shapes were diamonds, stars and nonagons (yep, 9 sided), and I decided to not try to piece a top with nonagons, so I stuck with the first two, originally wanting to do a beautiful top like this beautiful quilt.
But when I accidentally cut the strips wider than planned, the finished quilt would have been over 7 feet square.  Too big.  So I changed plans to what became the finished quilt.  


But a funny thing happened on the way to the finish line.  I accidentally sewed the strips above exactly as pictured.  In my original inspiration, the diamonds all went from light to dark to light, but the above ones are doing that the short way across, instead of the long.  I sewed 8 like this.  (At least I had the sense somewhere in my subconscious not to do them all!)  So I panicked, then decided to put those 8 as the diamonds that surround the center star, and then the change in color would continue on perfectly.


So I sewed the other 8 the way I had originally intended and chose this lovely pale yellow as the color for the blocks and triangles to finish the top.  (The gold bolt in the back was just too much IN YOUR FACE!!! color, so I ditched it)
Here's the star with all the squares sewn on.  I used this awesome video to know how to piece it all together.  (It was also my inspiration for the final pattern).  Y seams are easy! Yay!!! 


Then onto the bordering diamonds.  
I would like to say, this part was the easy part.  The hardest, scratch that, longest part was sewing the diamonds together.  To get all the seams matched up I tediously marked a quarter inch on each seam, then pinned each seam match up with a stay pin (is that what it's called? Where you put it straight up and down through the 2 fabrics?) and then pinned on either side of the stay pin.  Then I sewed.  So marking and pinning 25 seams for each diamond x 16 diamonds = 400 seams + 40 for sewing the diamonds into a star = 440 + 48 for all the square corners and bordering triangle corners = 488.  


My seams line up beautifully, though.  I'll find a close up shot (or take one) and share it with tomorrow's post, but I'm super proud of how nice the diamonds look.  Well worth the time and itchiness felt to move on.  

The top is finished off with corner triangles, and then to lengthen it a little (I feel uncomfortable with square quilts, seems wrong inside, I need a longer edge!) I added a 3 strip border on top and bottom, yellow, blue diamonds, yellow, and a single yellow border on the side.  


It didn't fit on the quilting frame that my mother in law lent me, and I was being a hermit in Salt Lake, so I did what I could.  Lay the batting down, lay the backing on top of it, smoothed it out, rolled it up and flipped it so the backing was on the floor.  (I tried doing backing then batting but I couldn't smooth the batting out, too sticky).  I didn't have basting spray or anything, just lay the top on the batting, smoothed it as best I could and safety pinned away.  I didn't do too bad, but I also wasn't planning on quilting it extremely dense or fancy, so it worked out just fine. 
I'm exhausted by the process, just explaining it is bringing it all back!  So I will leave the ending for tomorrow.  

(P.S. - I went to a rodeo! So exciting! (and rainy))

See you soon!
(With the final product!)

Wednesday, August 7, 2013

A Finished Quilt!!!

I finished a quilt!  I actually finished it about a month ago, but you may have noticed a lack of blogging in that time. 

I've been on a little bit of a vacation - my husband and I have been traveling a little for his work, a month in Salt Lake and now a month in Seattle.  


So I've been taking the time to do all sorts of sewing.  I quilted this Crazy quilt following my brother's suggestion, where instead of diagonally sewing through the points of the squares, I sew through the centers, so it crosses between two strips diagonally.  The picture above is much clearer than my explanation.


I followed the diamond pattern I had created with the stripes.  I love it!  I haven't had the courage to throw it in the wash, though.  The top is made up of so many different fabrics, I'm a little scared.  So I plan on using it until it's filthy and then giving it a go.  What's the worst that could happen, really? I'd actually rather just not think about it! 


The back is soooo cool! So simple, but the design shows through so awesomely!  It was my first time using a walking foot, as well.  After an hour of jerky, uneven sewing I realized I didn't have it on right, so once I fixed that, it worked amazingly.  


I don't know what I'm doing wrong with my corners, but they are not a 90 degree angles.  I'll have to look over those tutorials I read again before my next quilt. (Though, I'm actually excited, my next quilt is round! No Corners! So I'll have time to research my problem).


The little crease in them isn't beautiful, but honestly, I love my quilt to death anyway, imperfections and all, so I don't care!  But I'll want to make it better for future quilts that are gifts for others.  

See you soon! 
(with pictures of another completed quilt!)

Saturday, June 1, 2013

I was feeling crafty! (and a sneak peek)

I was feeling bold, so I shared a link to my wedding dance mini quilt project on the So You Think You're Crafty Craft Party page!  This is officially the first time I've ever done anything on another blog, other than comment on blogs whose authors I personally know.  So exciting!

Speaking of exciting, I saw this pillow up in Idaho Falls today when my husband and I made a quick stop in Target after going to a session at the temple.  (We were finally able to go together.  His work has been craaaaaazy!)    


It's super simple design, and the yellow fabric is raw edge appliqued onto the white. I tried to find it online, however, and it appears this pillow does not exist.  The closest I found was this pillow, which is also a really cool design, but not quite the same technique.

Also exciting is what I've been up to this week.  I love how this crazy mess of pins...


...can turn into things as elegant and clean as this...


These are examples of the shoulder bags and clutches/cosmetic bags I've been working on.  I love them!  (Especially this amazing boat fabric set).   I'm making matching clutches as well as non-matching.  I'll be listing them separately on etsy so people can pick a matching one, if they please, or one in total contrast, or none at all.  I'm excited because the shoulder bags are reversible!!  Always love a good multi-tasker.

See you later!
(With more details on more creations!)