Showing posts with label Bag. Show all posts

Friday, November 7, 2014

Scrap Buster #7 - (Ugly) Clothespin Bag

I used to have a friend in college who asked me to make him ugly mittens to match the ugly scarf his mom had given him.  It was the most hysterical and difficult thing I did.  It's hard to purposefully make something ugly when I usually do everything I can to avoid that.  And I wasn't sure if he wanted hideously ugly or just not very pretty.  I made them hideous.  He loved them.  That worked out.  He later commissioned a hat of the same variety.  Also hideous.  I learned to let go of my need for everything to always be esthetically pleasing.


Bringing me to my clothespin bag.  We line dry everything and desperately needed a bag in which to carry our clothespins.  I didn't like the ones that hung on the line because I'd have to drag it along the line as I pinned things up.  I didn't plan on keeping it on the line in between dryings since I didn't want it getting rained on.  I ended up just making a basic bag shape and then put straps closer to each other on one side than on the other to tie around my waist, making the opening fall open away from me so it would be easier to get my hand in and out.


The bag is made from 2 9-patch squares I made over 5 years ago with random fabric I had at the time.  I had 2, so I decided to use one for each side of the bag, but I didn't really like all the fabric and I didn't like how they were arranged.  I just wanted to use them up.  I ended up doing a disappearing 9 patch on it first.  Then I did the disappearing 4 patch technique on it, mixing up the pieces from both sides until I liked the arrangement better.  (I still don't love it as a beautiful thing, but I like it better than what I started with.)  I then used some fun palm tree fabric (again, stuff I wanted to get rid of) as the bottom and sides to make it big enough to house all my pins.  I lined it with some greenish/purple floral fabric (again, get it out of my stash!) and made the handles out of the same material as the lining.  Sewed the handles on and BAM! Clothespin bag.


It works just great.  Do I think it's beautiful? No.  Do I love it's function?  Yes.  Will I redo it?  Probably not until this one falls apart, so not for a while.  There you go.  I let go of perfect beauty for the purpose of function and clearing out fabric.  I feel good about that.  Yay for line drying!


See you soon!
(I've been doing better at keeping this promise lately!)

Monday, September 22, 2014

Scrap Buster #3 - Personal Progress Values Bag

I am an Activity Day leader for girls ages 8-11 in The Church of Jesus Christ of Latter Day Saints.  It's really fun and the girls are amazing.  One fabulous girl is graduating in a week because she is turning 12.  She is moving on to the 12-18 year old group of girls in Young Women and she will be starting Personal Progress, which is really exciting (and I have a feeling she will looove going through the activities in there).  The sad thing is she is leaving us.  Luckily we still get to see her every Sunday!  As a little goodbye gift, I decided to make her a bag.  Of course I decided this about an hour before her goodbye party started.  After 5 (frenzied) minutes of looking through bags on Pinterest, I decided to go for a floppy bag.  It closes without closures and it's a quick, basic structure.  


I ended up choosing to make the body with the 8 colors representing the Personal Progress Values (Faith, Divine Nature, Individual Worth, Knowledge, Choice & Accountability, Good Works, Integrity and Virtue).  The colors are white, blue, red, green orange, yellow, purple and gold.  I had the blue through purple fabrics left over from my WhirlyGig Quilt.  


The gold and white were other scraps, not quilting cotton.  I decided to put a band of those on the top of the other colors, one on each side of the bag.  The strap is from webbing that I had picked up at a thrift store.  It's sewn into the sides where the rainbow and top block of color meet.  The inside is just black quilting cotton.  


This bag was designed, cut and sewn (and last minute photographed) in 45 minutes.  I'm pretty proud of myself.  It's not perfect, but I didn't use a single pin (most obvious issue is the puckered white fabric, but it's quaint because it was homemade, right?)

I hope when she uses this bag it will be a regular reminder of all the amazing qualities she has and is working to strengthen.  She already said she wanted to use it for her Sunday scripture bag.  I love when what I make is used.  

See you soon! (I promise!)
(With projects that have been completed and just need pictures added to the posts)

Monday, September 16, 2013

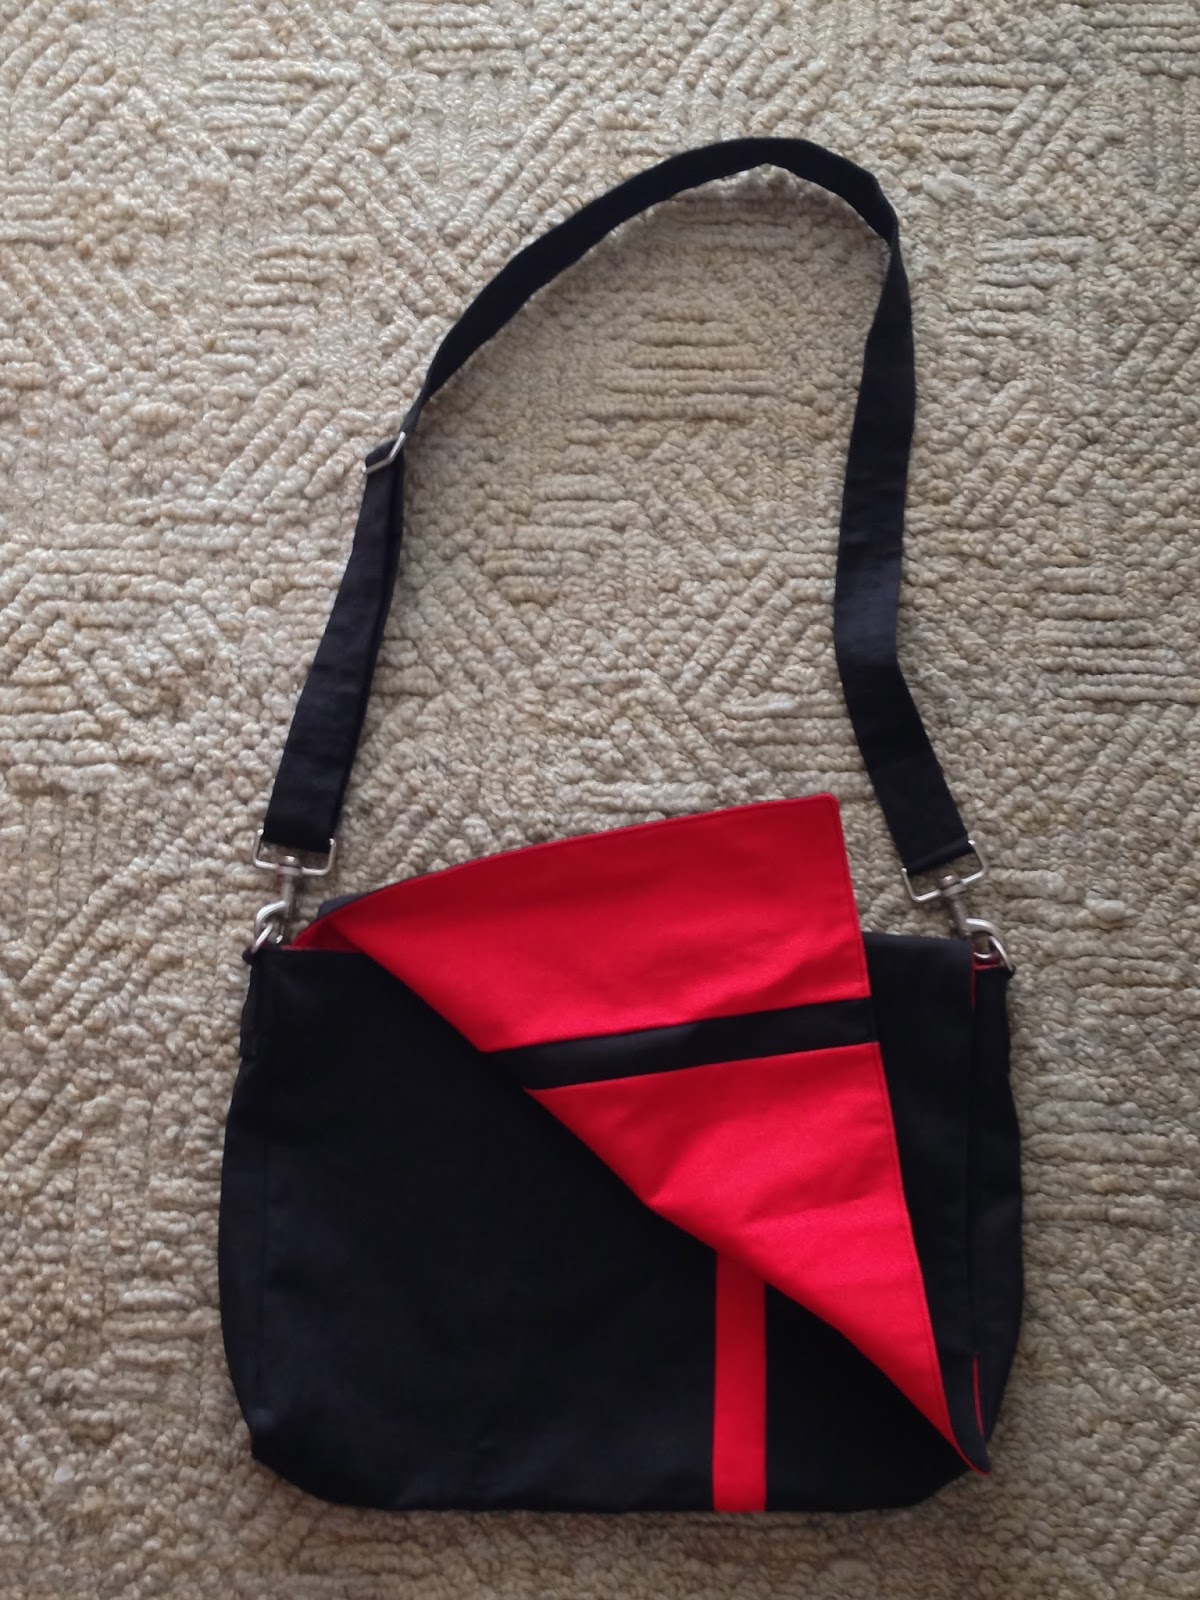
Happy Birthday, Brother Younger! I Made You A Bag!!

His birthday present was only 2 weeks late.  That's sort of a great record in our family.  I'm feeling a little proud of myself.  He had asked for a messenger bag a little while ago.  Really simple: one big pocket that could fit his laptop and a few extra thin notebooks.


He goes to the University of Utah, so I decided to spice the black up with some red.  A little subliminal support.  I'm in love with it.


The fabric is some heavy weave, tougher than just quilting or apparel cotton, but I think it was still cotton.  I got it at a thrift store and all it had was a price on it.  I'll have to take it in to a store someday and compare it to the fabrics they sell to figure out what it is!  It's a great weight for this project.  I made the two pattern pieces, then just cut a 1.5" strip out of both of them and sewed them into the opposite colored side to get the stripes.  I feel like racing when I see them.


The straps were tubes sewn and turned right side out (with a show on and a safety pin...slightly tedious, but worth it).  To keep it from shifting and for some fun detail I ironed it with the seam on the center back of the tube instead of the side and zig zagged a stitch down the seam through both sides.  


I knew I wanted an adjustable strap, mostly since I didn't know how long my brother's torso was...is.  He could also cinch it up if he was riding his bike or let it out a bit if he was wearing a super pouffy jacket.  Problem is, adjustable strap hardware is not really available on short term notice.  Basically you have to order it online.


However, if you happen to be roaming the aisles of Lowe's looking for alternatives at 9 at night, you might run into a great salesman with a sweet red beard who will give you a list of other places you could try (a few fabric/craft shops I was unaware of) and then say "You could always go to DI or Goodwill and buy a bag from there and use the hardware from it".  Genius, bearded Lowe's man, genius.


So that's what I did.  Got a sketchy, sort of smelly old leather suit/brief case for $3 and cut up the strap for the hardware.  (I am even considering re-donating it.  Is that bad to give it back without the strap?  It still has handles!  I'll mull it over a little more. )  I love that it has the clips (which my husband had suggested I do and I was skeptical - husband, you were on the money!), because the strap can be switched to have the adjustable part across his front or back. 


He also slings it across his right shoulder (which I thought was weird, having always had messenger bags slung from my left shoulder as a right handed person, and my brother younger is also right handed) so it can work if he lets a friend borrow it, or if I wear it around for the day before I give it to him...which I wouldn't (would I?).   It's quite simple, but it feels so well made!  (Sorry to brag, but I think it turned out really well).  I'm trying to figure out what color scheme I want to make mine in.


I didn't put any interfacing or fusible webbing or batting in it.  One, I only own the latter of the three afore mentioned items, and I like to just use what I have when possible.  Really, though, I wanted to keep it simple and lightweight and flexible.  I like that it conforms to the body's curves if it isn't full of a stiff laptop.  I never liked those people carrying around bags that stuck out from there far enough that I thought they needed a 'wide load' sign on it.  


So I left it simple.  But I have officially tagged my first item.  I have been working on these cross stitched tags for a while (sitting in church, sitting in class, sitting in the passenger seat, etc).  I showed my brother and asked him what color he wanted.  


I completely agreed with his color choice.  The green.  Love it!  (Actually, the top three colors, the gray, green and purple, will probably be a quilt color theme.  With the blue thrown in for some weight?)  Point being, loved his choice.  Then he asked for the half finished one.  The one that I ran out of thread on so I moved on to the next color, leaving the green to be finished later.  But that's what he wanted, and he is the birthday boy.  So that's what he got!  (Sorry I didn't get a picture of it sewn in.)


On another funny note of silly family being ridiculous, this is what my husband brought to me for breakfast when we first moved in to our new place (we couldn't find any bowls).  It's a gelato cup full of about 6 shredded mini wheats.  A mini cup full of mini wheats.  My husband is adorable.


See you soon!
(...with updates on whirligigs!)

Saturday, June 1, 2013

I was feeling crafty! (and a sneak peek)

I was feeling bold, so I shared a link to my wedding dance mini quilt project on the So You Think You're Crafty Craft Party page!  This is officially the first time I've ever done anything on another blog, other than comment on blogs whose authors I personally know.  So exciting!

Speaking of exciting, I saw this pillow up in Idaho Falls today when my husband and I made a quick stop in Target after going to a session at the temple.  (We were finally able to go together.  His work has been craaaaaazy!)    


It's super simple design, and the yellow fabric is raw edge appliqued onto the white. I tried to find it online, however, and it appears this pillow does not exist.  The closest I found was this pillow, which is also a really cool design, but not quite the same technique.

Also exciting is what I've been up to this week.  I love how this crazy mess of pins...


...can turn into things as elegant and clean as this...


These are examples of the shoulder bags and clutches/cosmetic bags I've been working on.  I love them!  (Especially this amazing boat fabric set).   I'm making matching clutches as well as non-matching.  I'll be listing them separately on etsy so people can pick a matching one, if they please, or one in total contrast, or none at all.  I'm excited because the shoulder bags are reversible!!  Always love a good multi-tasker.

See you later!
(With more details on more creations!)

Tuesday, May 21, 2013

A love, an Idea and a Premature Announcement (No, not Pregnancy)

I have fallen in love with quilting.  I'm working on my 3rd (ever) quilt and I have a feeling I'm hooked for life.  I've also decided that, since having read other quilters blogs who mention how they have quilts exploding out of every nook and cranny at their house, I would give my quilts as gifts to my nieces and nephews (for the most part, though I'm sure every family member and friend will end up with one eventually).  


I chose to give them one at the age of 12 because only one niece had passed that age (and she's 19, so I felt it gave me liberty to give her hers whenever I felt like it!), I wouldn't be pressured into doing 9 quilts in time for Christmas, and 12 years old is a big step.  It's their last year before becoming a teenager, they're working their way through middle school (the age I would put last on my list to revisit), and in our church, they leave Primary, which is the organization which teaches children ages 3-11, and they enter the youth program for 12 - 18 year olds. 12 is big!

(my birthday present from my mom!! I love my mom!!)

So 12 it is.  Problem is, quilting is expensive.  Even with my current WiP quilt, sewing the whole top from scraps I had on hand, I still spent $30 on the backing, binding, batting (yay alliteration!) and thread (alliteration downer), and that was after saving $20 with coupons.  My brain started going and I decided that I had so many bags and other crafts that were almost/mostly done, but that I really didn't need, and they could help me.


Like this bag - I love the patchwork front.  The bright pink lining, however, and the ragged 'I hoped it would look artsy but it just looks wrong' handle, they're not evoking the same love.  My plan - take all these projects, rip out what's not working (if applicable), finish them beautifully, and sell them on etsy.  I have dreamed of having an etsy shop since high school.  I'm finally going to do it!  And I'm hoping that I can raise enough money sewing bags (and other such items) to buy the fabric to make awesome quilts for my nieces and nephews to cuddle and grow up in.  So keep an eye out: after I've got a few finished, motenema will finally be on etsy!  

See you later!
(with a link to an esty shop???)

Monday, August 1, 2011

Project #11a-11n

Clutch Mania

So I decided for the end of the year to make thank you gifts for the teachers at the school I work with, and I have 3 boxes full of fabric swatches that a friend at Pratt gave me, so I decided to shoot two birds with one stone and make some gifts out of those swatches. And this is what happened.
I made 14 in bags in the space of 5 hours. I was getting button holes done in 45 seconds. They are quite simple and I actually complicated them more than I needed two. It's two swatches and a button, pleated on the bottom for expansion room and buttoned at top to keep the flap down. Very simple design, but the fancy upholstery fabrics make the clutches durable and elegant without crazy designs. I was lucky enough to have friends and family help me start a great button collection a few years ago. It was fun and simple and I got them done! That's my favorite part.

Wednesday, June 8, 2011

Project #9

Ducks

Tan on tan, not a good combo. (Especially not in a stretchy, unshapely skirt). Tan over bright pink and teal combined with ribbons upon ribbons, very good combo.


And the lace kinda looks like ducks for some reason.


I love the fringe. And I love the lace. And I love the colors.
I love the ducks.

Thursday, January 27, 2011

Project #3

Time to Write

I've had the idea for a pencil case for a while. It reminds me of my mothers German leather one, but I'm not a huge zipper fan, so I did a continuous flap with a strip to wrap and tie. The skirt I made it from had that great white inside so I didn't line it. My favorite: The contour of the flap.


Wednesday, January 26, 2011

31 Projects in 31 Days - Project #1

It's January! I know, I'm behind the times, but I am doing my projects, I'm just not doing well at documenting them. So here are they are, little by little.

Project #1- Kathryn


This is one of my favorite silhouettes. The blue is an old fat quarter and the orange is a great piece of old silk. It's 3 rectangles, one bag, one lining, one handle (which goes from the bottom corners and helps give it its shape. The pleats give it more shape and a little more texture. So beautiful.

Thursday, April 29, 2010

Corduroy Autumn Bag

This was an experimentation. My thought process in making bags goes like this: How can I take this strange material/object and turn it into a bag? This typically leads to intricate folds and shapes that are inspired by my material. On this bag, however, I tried to use more than one kind of fabric and add some non-essentials. The result? I think it's great. It's just not really my thing.

So everything you see is corduroy pants, which makes it feel quite nice. There are four square panels of brown on each side, decorated in green and edged in orange. (I just happened to have fall colored cords lying around.) The handles are two layers, one green and one brown, and the whole thing is lined in green. I quite like the general shape and how the brown cords lie in intersecting patterns causing a nice sheen/matte contrast depending on the light.
For the most part, however, I have abandoned non-essentials. I may try again soon. Maybe.

Thursday, April 22, 2010

No-Sew Scarf Bag


No Sew bags are my favorite because they're usually really quick and easy and I get complimented on them more than any other bag. Sad, almost... This one is really amazing, though. Your materials include: a scarf. That's it. And two working hands; though all you need to do is tie knots, so you can probably even manage one-handed.


Start with a scarf, sarong, or any rectangular material. The thinner the better or the knots get too bulky. My scarf was about 56"x40" ish.


The next step is to fold the scarf in half like a hamburger, short ends together making it more like a square. I do wrong sides together so that the hem is on the inside of the sandwich. (If you have a thicker fabric, you can start off with a square piece and not fold it in half. Scarves tend to be thin and therefore need the doubling for durability)


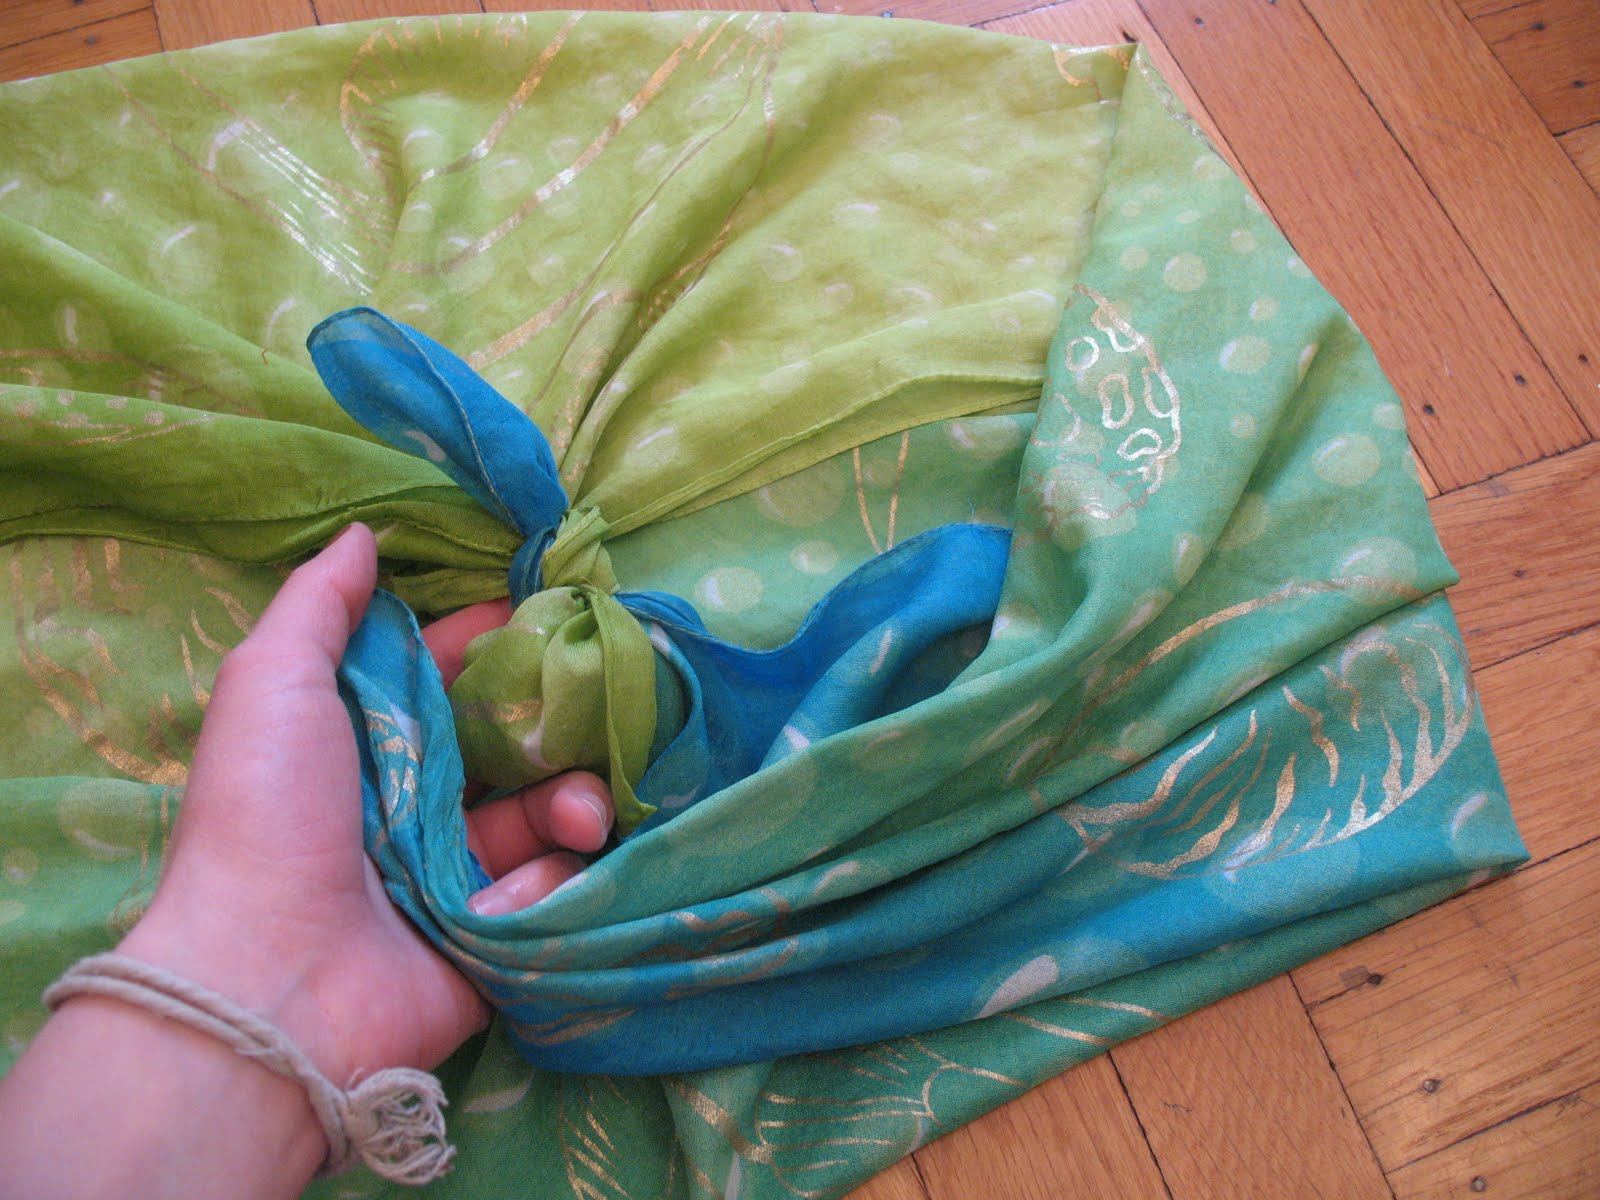
Next, bring to opposite corners together...
...and tie them in a double knot. It's your choice how close to the corners to tie. I like a little bit of bunny ear flop.

Next, if the scarf is not perfectly square, find the shortest edge that leads to the right corner. In my case, this edge is coming from the lower half of my double knot.

Taking the right corner, wrap it around the lower half of the knot, over top first...

...then underneath so it comes up on the same side you started wrapping from.
Do the same for the left corner: find the shortest edge...

...wrap it over the top of the higher half of the knot...

...and pull it back under to the left of the knot.

Now the two corners are on the same sides they started on, but they're twisted around the double knot.
Tie the two ears corners together...
...into a double knot.
And there you have your final scarf bag. It's very simple and the best part is, you can undo it and use it as a scarf again. Once you get the hang of it you can do it in less than a minute.
If your scarf is still not close to square when you fold it, try putting the fold 1/3 of the way down instead of 1/2. That will be the bottom 'seam' of the bag.

If you put the excess fabric on the outside of the bag it hangs and, in this case, gives the bag a nice fringe along the bottom. You can also put the excess inside for a cleaner look.